
Contents
You can control the ARC1 user interface with the touchscreen and by using the speed controller and its pushbutton. The graphical user interface is divided into a main area at the top, and a navigation bar with icons at the bottom of the screen. With navigation bar icons, different views are selected and various actions can be triggered. The following will explain the user interface and the control / programming of locomotives in detail. Besides controlling the locomotive speed, the speed controller is also be used for selecting menu entries and thus its pushbutton is called Select.
List View
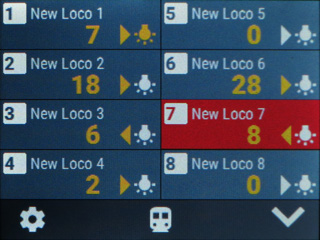 |
After power-on, ARC1 starts into the List View. The List View shows all locomotives that are stored on ARC1 and provides basic information at a glance, such as the number, name, speed (in speed steps), headlight status and direction of travel of each loco. Per default, the List View operates in select mode, which means that the currently selected locomotive (grey background) can be chosen with the speed controller. Pressing Select on a selected loco will open the Locomotive View for a detailed view. If the end of the list is reached during selection and there are more than 8 locomotives stored on ARC1, the List View automatically scrolls to the next 8 locos. Manual scrolling is done with the For convenient parallel operation of multiple locos on the track, the List View can also be used for controlling the locos. Simply touch on any of the locomotives in the list to activate it for control (red background). As soon as the loco is shown with red background, its speed and direction is adjustable with the speed controller. Pressing Select at the same time when adjusting the speed, the speed change is done in steps of +/-10. Touching a second time on a loco that’s already activated for control will open the Locomotive View. Pressing Select on a loco that’s already activated for control will disable the control mode and switch back to select mode. Navigation bar:
|
Locomotive View
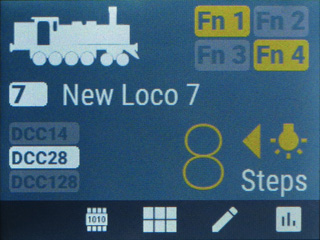 |
The Locomotive View provides advanced control of the loco (such as headlights and functions) and offers more information and options than the List View. You can also access the locomotive statistics, edit or delete the loco and program the locomotive’s decoder Control Variables (CVs). Within the Locomotive View, the speed controller is only used for adjusting the speed and direction of travel. Pressing Select at the same time when adjusting the speed, the speed change is done in steps of +/-10. The current direction of travel is indicated be the yellow arrow next to the speed indication. Right next to it, the touch button Pressing Select or Navigation bar:
|
Emergency Stop
| An emergency stop of all locomotives on the tracks can be triggered at all times and independent of the current view by pressing the blue button on the board or by pressing the external emergency stop button (if connected to PA0). The emergency stop signal is processed with highest priority and causes an immediate stop of all locomotives. |
Locomotive Management
 |
Every locomotive stored on ARC1 is managed by a unique number. This number is independent of the locomotives given decoder address. ARC1 can manage and permanently store up to 200 locomotives.
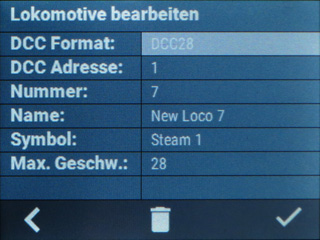
Create a new locomotiveA new locomotive can only be created with the help of the List View. To do so, scroll down to the end of the list and press the Edit a locomotiveTo edit a locomotive, you first have to open the Locomotive View of the desired loco. The
After the adjustment of a setting is done, press Select again to switch back to setting selection. Press Delete a locomotiveTo delete a locomotive, you first have to open the Locomotive View of the desired loco. The |
Program the Locomotive Decoder Configuration Variables

|
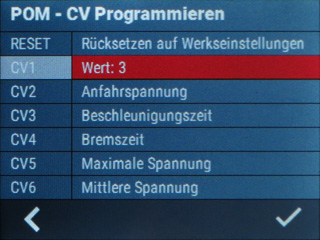
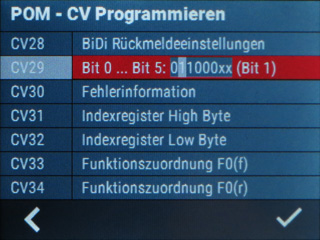
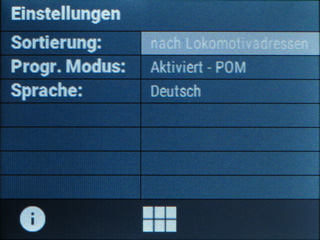
Programming the locomotive decoder Configuration Variables (CVs) is only possible if the programming mode is activated in the global settings. You first have to open the Locomotive View of the desired loco and then press the chip icon in the navigation bar to open the programming mode. In the programming mode, all CVs are listed that can be accesses by ARC1. Use the speed controller to select the desired CV (grey background), then use Select to activate the CV for adjustment (red background). If a CV is activated for adjustment, the speed controller is used to change the value.
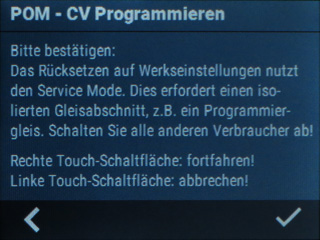
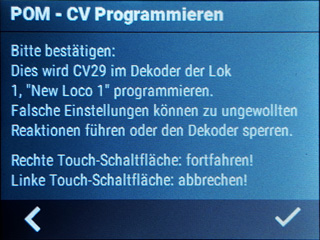
Important: ARC1 currently does not support decoder feedback, thus all CV values shown on the display are either the default values or recently programmed values. Thus, the shown values do not necessarily correspond to the real CVs of the decoder. Depending on the CV, some values are easier provided in binary form (e.g. CV29) while others are easier provided in decimal form. Set decimal valueIf a CV is programmed by a decimal value and activated for adjustment (red background), the value can be adjusted with the speed controller. Set bitwise valueIf a CV is programmed bit by bit and activated for adjustment (red background), the speed controller is used to select the desired bit first. Pressing Select toggles between editing the bit value (0 or 1) with the speed controller or selecting another bit. Apply and confirm programmingTo apply the changes and program the CV value to the locomotive’s decoder, press the Reset to decoder factory settingsTo reset the decoder CV values to their factory default settings, select the first entry (“RESET”) of the CV list. If you select RESET with Select, it is first shown with red background and requires pressing Important: Resetting the decoder CVs to factory settings requires operation of DCC in Service Mode. It is strongly recommended to use a dedicated “programming”-track on your model railroad with no other locomotives and electrical loads instead of your regular tracks. Please also note that the decoder reset is not performed immediately within the decoder and requires a power cycle. |
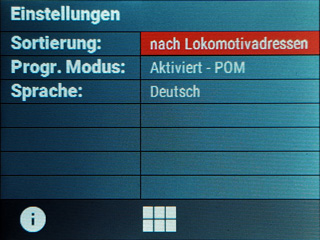
Global Settings
|
To get to the global settings, press the
|
Firmware Information
| Screenshot | The Firmware information page shows the current ARC1 firmware version number. The version numbering scheme is as following:
v.<ARC Version>.<Main-Version>.<Sub-Version> build <Build-Number> |